South African Film Academy
Essential Skills For Film & Television Production
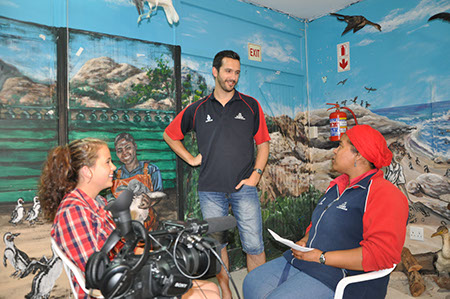
Building a Small Television Studio
Follow this series where I will be discussing the small television studio. This is based on my broadcast experience in national television and community television.
A unique way of controlling a broadcast from a remote location. Your guests can be all over the world and your presenter can be in a studio, which is real or virtual and the control room can be in a remote location. It will seem as if the Production is coming from a television complex. This allows for a professional looking show to be produced without using expensive television facilities with the same results.
REMOTE BROADCAST
PHOTO TIPS
.jpg)
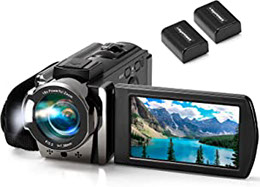
Cameras for the for the beginner and more advanced video producer
What goes into building a television studio. In the next few months I will post a series of talks on the many challenges one faces when tackling the small television studio. I also want to dispel the many myths surrounding the budgets needed and show how one can achieve great results and save loads of money. I will answer all your questions and hopefully help you achieve your goals.
Included in these talks will be equipment analysis for items such as cameras, lights, vision mixers, recording and Studio accessories. Also, the acoustic treatment, sound protection, access, cables, connectors, streaming, software and much much more.
I will also go through the many television production studio protocols and techniques as well as covering some useful engineering practices.
Topics
Structure borne noise
Air borne noise
Acoustics
Acoustic materials
Blogs added once a week
NEW
Acoustic Continued
Microphones
The small studio build

The studio is the area where all your performing in front of camera is done. So, one of the most important factors is treating the ‘room’ to keep out unwanted noise. The two main areas of sound treatment involve the sound proofing of the studio and the acoustic treatment, which are totally two different concepts, often confused and intertwined. The success of this treatment largely depends on the structure of the building, its location and to what it is attached. Noise gets into areas a few ways;
air-borne noise where sound from external sources enter the area through windows and walls. This can be an airplane, construction noises, people talking, dogs barking, traffic and many other sources of noise. The frequency of the sound waves also affect the penetration into an enclosure-your studio. Sound waves manage to get throuigh any openings, which makes it really difficult to keep out. These openings are the result of the different installations necessary for the studio build. Things such as air conditioning, cable entries, doors, ceilings, and many other factors that suddenly exist as the build progresses.


Sources of noise
Structure Borne Noise
Books on acoustics


Rumble noise through ground
The other source of unwanted sound/noise is structure-borne noise. This is when say vibrations of heavy-duty machinery rumble though the building, sort of earth-quake like. This type of noise is more difficult to control, and hence the need to find a location where this effect is at a minimum.
If one could afford to go into the countryside far away from the madding crowd so to speak, many of the problems we are going to discuss could be avoided, or just not present. However, in most cases we are not so fortunate!
So, structure-borne noise often requires drastic measures. Part of any solution to keep noise out, which is the concept of a room within a room. To keep out structure-borne noise the room, including the floor must be separated from the outer room and in effect the ground (which is always connected to the outside world). This is termed, floating the room, by using pliable separators such as springs or rubber dampeners. Of course, this can be, and is wildly expensive and one of the noise interventions you may have to live without.
Mass dictates the amount of noise that can be stopped from entering a room. So, for starters, bricks and mortar is a good start construct your room within a room. The other dictate to keeping noise out is an air trap. An air gap stops the noise more effectively than fixing materials to the wall alone. The inner room walls should be of a different thickness to the outer room walls. This is to stop frequencies resonating and passing though the cavity. This is especially true when using dry wall as your inner or outer room, or both.
So, the trick is to get as close as you can to achieving separation from the outside world as is affordable. Of course, the studio elements such as lighting and people and equipment will use up oxygen and will introduce heat which will add to the problem of noise intrusion. I will deal with these problems later. However, just keep as much noise as you can out of the studio. Most listening audiences probably have a higher level of noise than that of the studio, so in effect the noise that does enter the studio is overwhelmed by the listener at home anyway. So far we have discussed keeping noise out, but not the shape of the room, which we will talk about soon.
The small studio build
Acoustics
Books on acoustics
The small studio build
WE CONTINUE WITH THIS DISCUSSION NEXT WEEK

First lets look at some of the properties of sound that will help understand why we need to apply acoustic treatment to an enclosure, or the room that will be your studio.
When sound is propagated from a source, and hits a surface, lets say a very hard surface that it cannot penetrate, it will bounce off the surface at the same angle it arrived. Now if we generated sound in our solid room with no treatment, the sound waves would bounce in all directions from surface to surface. The results would be reverberation, where the sound source has stopped but the reflections continue. Like in the shower, when the small enclosure, covered in tiles make you sound good when you sing. The sound from your voice has the appearance of amplification and reverberation. Of course, in your studio, this is bad news. So, we must control these reverberations and the effect it has on your sound.
The worst shape room is an exact cube, where all sides are parallel. We have six sides, the floor, roof, and four walls. We’ve seen how sound is reflected according to the angle it strikes the surface.
Here are a few scenarios.
The sound hits the surface at ninety degrees. What happens? Well, it comes straight back and heads towards the opposite wall and is once again sent back to the hall it first struck. The causes an effect known as standing wave, which is not good. The science of standing waves is complex, but what you need to know is standing waves create nodes that negatively affect the sound of the room. This is due to modification of the original sound wave.
First rule for sound treatment:
Avoid parallel walls
Over the years there has been a lot of research for how much reverberation is good for a specific size of enclosure, and for what purpose that enclosure, or room is used for. The acoustic for a small studio is decidedly different to that of a concert hall. The diagram below shows the different reverberation times needed or proposed as ideal for the size of enclosure.
So, how do we control the acoustic of our studio. Well first, we need to understand how different materials affect sound. All material have an absorption coefficient, which dictates the amount of sound that is reflected and the amount absorbed. By definition, absorption coefficient of 1 means that all acoustic energy striking the surface will be absorbed and none reflected. A coefficient of 0 means that all the energy fully is reflected. The diagram below shows a list of materials and their associated absorption coefficients. We use these numbers to help us decide which materials are best for treating the acoustics of the room. As we have seen by the reverberation time assigned to different rooms, we know that we do not want to get rid of all the reverberation, but rather control the sound reflections in a way it suits the application of the room.
Second rule: Don’t get rid of all the reverberation!
Before we continue, here is a reminder that we are building a small television studio, and besides the acoustic treatment, we must take into account the needs of camera movement, lighting and sets. These all create problems that are not present is a normal sound recording studio, where only the people and maybe instrument nuances affect the acoustics, which is minimal compared to the elements introduced into the television studio, especially, the small studio.
Obviously, before we decided to build the studio, we have a good, or exact idea for what the studio is being used. You may be a one-man band, who just wants the best possible sound and lighting for presentation to camera with a green screen background, or you could be setting up a community television station for broadcasting local news, magazine shows and current affairs.
In the figure above, the guitar caused the propagation of sound waves. Now these waves go out in all directions and reflect of the wall at the same angle of incidence. We are assuming the square room has solid surfaces and no sound is allowed to escape - what we are trying to achieve in our studio. The problem now is that the sound is reverberating all over the room, sort of like being in a shower. Wave C is an example of how the reflections develop.. This is just one point source from the guitar, in fact there are many more of these going out in all directions adding to the reverberation of the room. The problem in this square room is shown by waves A and B, A is the original wave and B is the reflected wave which in this case is reflecting back on the same path, and causing a standing wave, which is not good and will be expanded on later,
Basic definition of reverberation time: The time it takes a sound in a room to diminish too a certain level. This is measured in seconds. Where there is no reverberation, 0 secs means that no reflection of the sound occurred. Our quest is to get the room we are working in to have just the right amount of reverberation time, We control this by using the materials on hand to absorb or reflect sound waves. This involves knowing which frequencies are affected by which materials, combined with the actual size of the room.
Remember your filming projects can be made a lot easier using the many accessories available at very reasonable prices. Click below and see for yourself.
Watch out for the live discussion on facebook with Rob Gray................
Acoustic continued
So, we now know that our studio should not be a square room if we can help. Ideally, all the walls should not be parallel to each other, and the roof should be high enough to lessen the effect of standing waves (with the help of some acoustic treatment. However, in most cases you are saddled with what you have and, budget restraints. As explained, keeping unwanted noise out must not be confused with the acoustic of the room. An enclosure with lots of reverberation, that is a long reverberation time (see definition) is termed as being “live”. And conversely, an enclosure with no reverberation is termed as “dead”. So, your task is to get the studio (enclosure) somewhere in-between, depending on what you are using it for in the main. If you have the budget, there are many great products that can be used to stop reverberation. First prize will be to hire an acoustic consultant to do measurements that will accurately present data for treatment purposes. At the other end of the scale, you can use any material that will absorb sound frequencies to lessen the effect of reverberation. This could be carpets, soft furniture, insulation, foam and cheap acoustic tiles. Later on, when we get to sets, you will see how these can affect the sound in your studio.
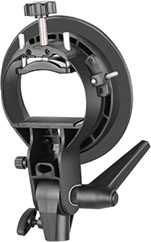
LIGHTING WITH YOUR FLASH
A flash unit conveniently fits onto the hot shoe of your camera. This is great for point and shoot photography. However, lighting with a flash from one angle limits the value of unit with respect to more creative lighting. Using the speedlight remotely vastly increases the aesthetic of your photographs by allowing you to control shadows by placing the flash where best suited.
• Great combination of L-type and T-type Speedlite mounts and improved from them
• No pre-assembly & post-disassembly. Smaller size, lighter weight, less space occupied
• Unique speedlite mounting method: the speedlite can be clamped firmly into the mount both horizontally and vertically
• Reliable mounting: firm clamp between 2 pieces of soft plastic, no pressure nor metal scratch to your Speedlite
• Bowens mount design facilitates most studio flash accessories, e.g. softboxes, reflectors, beauty dishes, etc
Click on image below to see the range of accessories to help make your photography and filming a lot easier.
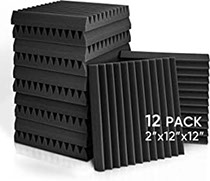
Click on picture for more information about Acoustic Tiles
Acoustic Materials
Different materials absorb sound according to the structure of the material. There are materials designed specifically to absorb certain frequencies and at the same time let certain frequencies through. So, materials have an absorption coefficient assigned. This a ratio defined as the amount of energy absorbed to the amount of energy reflected away from the material. Total absorption is a whole number 1. So a window in a room would have an absorption coefficient of 1.
A carpet absorbs a certain amount of sound energy and reflects some. Now, the absorption and reflection are different for different frequencies for the same material.
The coefficient of carpet would look like this.
.05 at 125 Hz, 0.10 at 250Hx, 0.25 at 500Hz, 0.4 at 1000Hz, 0.60 at 2000Hz, 0.7 at 4000Hz, so you see that even though the carpet absorbs sound energy, it also depends on the frequency how much it absorbs. So the closer to 1 the number gets, the more absorption, and in turn the less reflection and reverberation in the room.
https://www.camerastuff.co.za/shop/74452-godox-umic82-multi-pattern-usb-condenser-microphone.html?a_aid=Safilmacademy
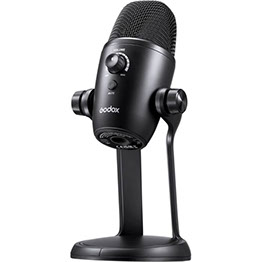
Choosing microphone/s
When setting up a small television studio, choosing the right microphone is essential for ensuring high-quality audio recordings. With so many different types of microphones available on the market, it can be challenging to determine which one is best suited for your studio's needs. In this article, we will discuss the key factors to consider when selecting a microphone for a small television studio.
Microphone type:
There are three main types of microphones: dynamic, condenser, and ribbon. Dynamic microphones are sturdy and can handle high sound pressure levels, making them suitable for live performances and recordings. These microphone types do not need power to generate a signal. The gain is achieved via pre-amplifiers and the mixing desk via the channel gain. A preamplifier, also known as a preamp, is an electronic amplifier that converts a weak electrical signal into an output signal strong enough to be noise-tolerant and strong enough for further processing, or for sending to a power amplifier and a loudspeaker. Without this, the final signal would be noisy or distorted. Condenser microphones are more sensitive and provide greater detail and clarity. They are better suited for studio recordings and vocals. Ribbon microphones are sensitive and provide a warm, natural sound, making them ideal for recording instruments and vocals. Condenser microphones require some sort of power, either a battery or power from a source; which can come from a mixing desk in the form of phantom power. Phantom power is a method of providing DC voltage to a condenser microphone through its audio cable. This voltage is required to polarize the diaphragm of the condenser microphone, which is necessary for it to function properly. Phantom power is usually supplied by a mixing console, microphone preamplifier, or a separate phantom power supply. It is called "phantom" because the DC voltage is present on the audio cable but does not affect the audio signal traveling through the same cable. The most common voltage used for phantom power is 48 volts DC.
For a small television studio, a condenser microphone would be the best choice as it can capture clear audio recordings and pick up nuances in sound. Radio lavalier microphone are most used in studio recordings.
A radio lavalier microphone, also known as a wireless lavalier microphone, is a type of microphone that is designed to be worn on the body, typically attached to clothing or hidden underneath it. It is commonly used in television, film, and live productions where a hands-free or inconspicuous microphone is required.
The term "radio" refers to the fact that the microphone communicates with a receiver using radio waves, allowing for wireless transmission of the audio signal. The receiver is typically connected to a sound system or recording device, allowing the audio to be amplified, recorded, or broadcast.
The lavalier microphone itself is a small, omnidirectional, or directional condenser microphone that is designed to capture sound in close proximity to the person speaking. The microphone is usually attached to a clip or a small mount that can be easily attached to clothing or other objects. The wireless technology allows for greater freedom of movement and eliminates the need for cumbersome cables.
Directionality:
Microphones have different directional patterns, also known as polar patterns. The three main polar patterns are cardioid, omni-directional, and bi-directional. Cardioid microphones are unidirectional and pick up sound from the front while rejecting sounds from the rear and sides. Omni-directional microphones pick up sound from all directions, while bi-directional microphones pick up sound from the front and rear.
A cardioid microphone is ideal for a small television studio, as it can isolate the speaker's voice and eliminate background noise.
Sensitivity:
Microphone sensitivity refers to how efficiently the microphone converts sound waves into electrical signals. High-sensitivity microphones can pick up subtle sounds and are suitable for quiet recording environments, while low-sensitivity microphones are better suited for high sound pressure level recordings.
In a small television studio, a high-sensitivity microphone would be ideal as it can capture even the slightest sounds and provide a clear audio recording.
Connectivity:
Most microphones connect to audio interfaces or mixers using an XLR or USB cable. XLR cables are professional-grade and provide balanced audio signals, while USB cables are more accessible and offer plug-and-play connectivity.
For a small television studio, a microphone with a USB connectivity option would be ideal as it simplifies the recording process.
Budget:
Microphone prices vary significantly, and it's essential to choose a microphone that fits your budget. While high-end microphones offer superior audio quality, they may not be necessary for a small television studio.
It's important to choose a microphone that provides the right balance between audio quality and affordability.
In conclusion, choosing the right microphone for a small television studio requires careful consideration of the microphone type, directionality, sensitivity, connectivity, and budget. By taking these factors into account, you can ensure that your small television studio has the right microphone to capture clear, high-quality audio recordings.
Interesting Facts
Here is a list of audio levels in decibels (dB), ranging from quiet to damaging loudness:
0 dB - The threshold of human hearing, the quietest sound that can be heard by the human ear.
30 dB - Whispering at a distance of five feet.
60 dB - Normal conversation at a distance of three feet.
80 dB - Busy city traffic or a blender at a close distance.
100 dB - Chainsaw or jackhammer at a close distance.
120 dB - Jet plane taking off at a close distance.
140 dB - The threshold of pain, can cause immediate and permanent damage to hearing. Examples include fireworks, firearms, and loud concerts.
It's important to protect your hearing from sounds that exceed safe levels. Exposure to sounds above 85 dB for prolonged periods of time can lead to hearing loss. If you're regularly exposed to loud sounds, consider investing in hearing protection or reducing your exposure time.
Copyright RPC Gray: HND Electrical Engineering Broadcast, OD-ETDP, Registered MICT SETA, GEN111 InfoComm International
Web Design Rob Gray